> ## Documentation Index
> Fetch the complete documentation index at: https://docs.leadpipe.com/llms.txt
> Use this file to discover all available pages before exploring further.
# Manage pixels
> Create, verify, and control Leadpipe tracking pixels
## Overview
Use **Pixels** to control where Leadpipe collects data and how each tracked site behaves.
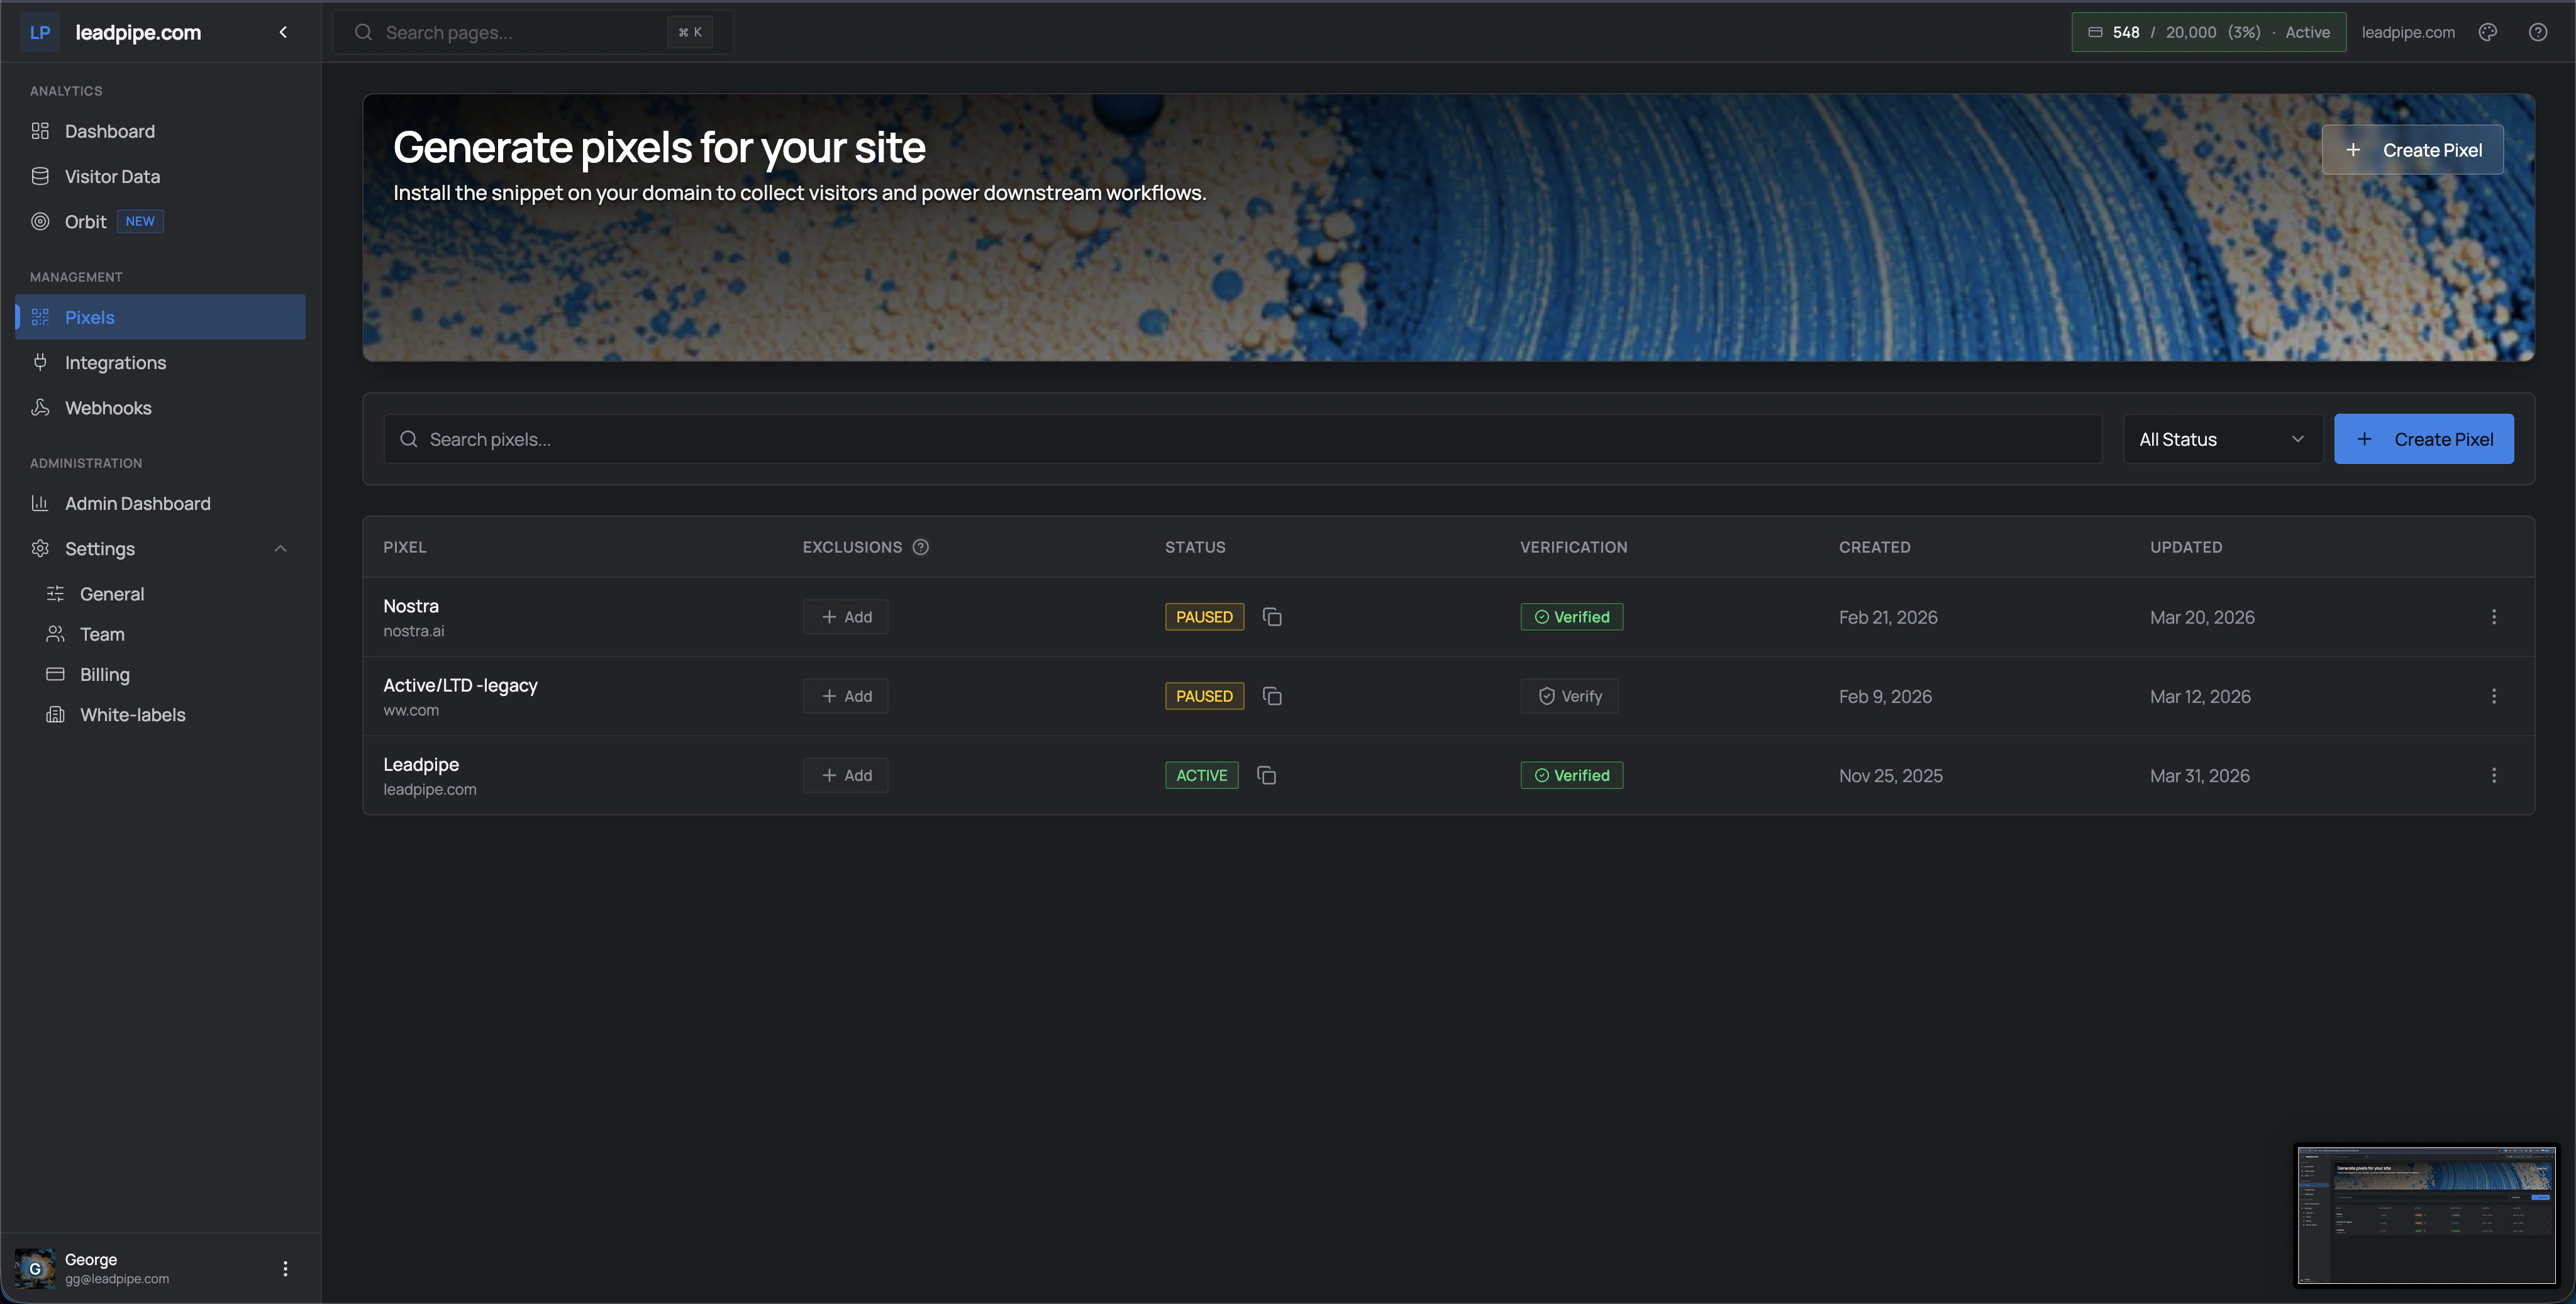 Each pixel gives you a place to manage:
* Domain coverage
* Verification state
* Active or paused status
* Allowlist or denylist path filters
* Created and updated history
The page also gives you search, status filtering, and a top-level **Create Pixel** action for adding new sites quickly.
## Core tasks
Use **Create Pixel** when you want to start tracking a new site or domain.
Open the pixel code, copy it, and place it in the header of the site you want to track.
Verification confirms the pixel is installed and collecting from the intended site. Pixels can verify automatically after installation, and the page also gives you a manual verify action.
Pause a pixel when you want to stop collection without deleting the setup.
Use exclusions to prevent unwanted paths from being tracked for a given pixel, such as blog content, demo paths, or other pages you do not want included in the workflow.
If you want the pixel to fire only on a short list of paths, use include-only mode instead of exclusions.
## Basic install flow
1. Create the pixel for the site or domain you want to track.
2. Open `View code`.
3. Copy the snippet.
4. Paste it into the site header.
5. Return to **Pixels** and confirm the pixel verifies.
If you only want to track part of the site, add exclusions for the paths you do not want included.
## Path filters
Leadpipe supports two path-filter modes for pixels:
| Mode | Field | Behavior |
| --------- | --------------- | ---------------------------------------------- |
| Default | — | Track on every page |
| Allowlist | `includedPaths` | Track only on matching path prefixes |
| Denylist | `excludedPaths` | Track everywhere except matching path prefixes |
These two modes are mutually exclusive. A pixel should use one or the other.
Use allowlist mode when only a few high-value paths should be tracked. Use denylist mode when the pixel should fire broadly but skip low-value areas like blogs, careers pages, or support content.
## What the table columns mean
| Column | What it means |
| -------------- | -------------------------------------------------------- |
| `Pixel` | The pixel name and domain it belongs to |
| `Exclusions` | Quick access to add path-level exclusions |
| `Status` | Whether the pixel is currently `Active` or `Paused` |
| `Verification` | Whether the pixel has been verified on the intended site |
| `Created` | When the pixel was created |
| `Updated` | When the pixel was last changed |
If you are working through the API, the pixel list also includes `pausedReason`, which explains why a pixel is paused.
## When to use multiple pixels
Use separate pixels when you need to split tracking by:
* Brand
* Domain
* Team ownership
* Automation routing
This keeps reporting and downstream automations easier to reason about.
## Keep your pixel setup clean
* Name pixels clearly
* Match each pixel to the correct domain
* Review paused and unverified pixels regularly
* Add exclusions when internal or irrelevant paths distort the data
* Use separate pixels when different sites need different routing or reporting
Each pixel gives you a place to manage:
* Domain coverage
* Verification state
* Active or paused status
* Allowlist or denylist path filters
* Created and updated history
The page also gives you search, status filtering, and a top-level **Create Pixel** action for adding new sites quickly.
## Core tasks
Use **Create Pixel** when you want to start tracking a new site or domain.
Open the pixel code, copy it, and place it in the header of the site you want to track.
Verification confirms the pixel is installed and collecting from the intended site. Pixels can verify automatically after installation, and the page also gives you a manual verify action.
Pause a pixel when you want to stop collection without deleting the setup.
Use exclusions to prevent unwanted paths from being tracked for a given pixel, such as blog content, demo paths, or other pages you do not want included in the workflow.
If you want the pixel to fire only on a short list of paths, use include-only mode instead of exclusions.
## Basic install flow
1. Create the pixel for the site or domain you want to track.
2. Open `View code`.
3. Copy the snippet.
4. Paste it into the site header.
5. Return to **Pixels** and confirm the pixel verifies.
If you only want to track part of the site, add exclusions for the paths you do not want included.
## Path filters
Leadpipe supports two path-filter modes for pixels:
| Mode | Field | Behavior |
| --------- | --------------- | ---------------------------------------------- |
| Default | — | Track on every page |
| Allowlist | `includedPaths` | Track only on matching path prefixes |
| Denylist | `excludedPaths` | Track everywhere except matching path prefixes |
These two modes are mutually exclusive. A pixel should use one or the other.
Use allowlist mode when only a few high-value paths should be tracked. Use denylist mode when the pixel should fire broadly but skip low-value areas like blogs, careers pages, or support content.
## What the table columns mean
| Column | What it means |
| -------------- | -------------------------------------------------------- |
| `Pixel` | The pixel name and domain it belongs to |
| `Exclusions` | Quick access to add path-level exclusions |
| `Status` | Whether the pixel is currently `Active` or `Paused` |
| `Verification` | Whether the pixel has been verified on the intended site |
| `Created` | When the pixel was created |
| `Updated` | When the pixel was last changed |
If you are working through the API, the pixel list also includes `pausedReason`, which explains why a pixel is paused.
## When to use multiple pixels
Use separate pixels when you need to split tracking by:
* Brand
* Domain
* Team ownership
* Automation routing
This keeps reporting and downstream automations easier to reason about.
## Keep your pixel setup clean
* Name pixels clearly
* Match each pixel to the correct domain
* Review paused and unverified pixels regularly
* Add exclusions when internal or irrelevant paths distort the data
* Use separate pixels when different sites need different routing or reporting